Building a Bootable Version of OSForensics using WinPE

OSForensics can be configured to start directly from a bootable USB Flash Drive (UFD), rather than being started from within a machine's operating system. This can be useful when the machine you need to run OSForensics on has an invalid, incompatible or otherwise non-working operating system.
Important note: Only use this option if you need to BOOT from a USB drive. If you only need a portable version of OSForensics that can run from a USB drive on a live system, the use this alternative, much simpler procedure.
To run OSForensics on a machine without a valid operating system, you will need to set up a “Pre-install environment” that allows Microsoft Windows to be booted from a UFD. PassMark Software has created a tool, WinPE Builder to help guide you through setting up a Microsoft Window Pre-install environment (WinPE) which includes both Windows and OSForensics on a bootable UFD. The process will also allow you to inject new device drivers into the Windows image for system specific hardware (where required).
Additional Notes:
- Each OSForensics license allows for 1 machine install and 1 USB install. Meaning you can have OSF installed and running on your lab desktop, and ready for field use on a bootable USB at the same time.
- When creating a bootable version of OSForenscis using a subscription license key, the image will need to be created on a computer that has internet access to properly activate the installation. No online connection is required to use the WinPE installation afterwards. Also, as the WinPE image is static/read-only once created, the installation will expire when the current subscription period is up. You will need to generate a new WinPE image each month with a new key. You can find subsequent issued subscription license key within your account.
Creating a self bootable OSForensics with PassMark WinPE Builder
Windows Preinstallation Environment (PE) is a lightweight version of Windows built on the Windows Kernel. Windows PE is not designed to be the primary operating system on a computer; however, it can be useful for forensics purposes. For purposes such as data access, data recovery, or booting a machine without an OS installed. This tutorial will walk through the process of creating an OSForensic bootable solution on an USB Flash Drive using PassMark WinPE Builder.
Before we begin:
With OSForensics it is possible to make your own self booting USB flash drive from within the OSForensics software.
- Download and install an Windows Assessment and Deployment Kit (WADK) and WinPE Addon from Microsoft. Make note of the installation directory.
- A copy of OSForensics installed on your computer and your license key email.
- A USB Flash Drive (UFD). Back up any important data on the UFD, drive will be formatted during the build process.
For the most part, all the options in PassMark WinPE Builder will be set to the default. You should not need to adjust the settings unless you want to customize your WinPE build to include additional tools. The WinPE Builder program can be located in the OSForensics' Program install directory or launched from within the program itself from the Install to USB option.
Alternatively, it is possible to make your own self booting USB flash drive without using WinPE Builder by following the instructions provided in the following guide.
Exporting OSForensics files to be used in WinPE Builder
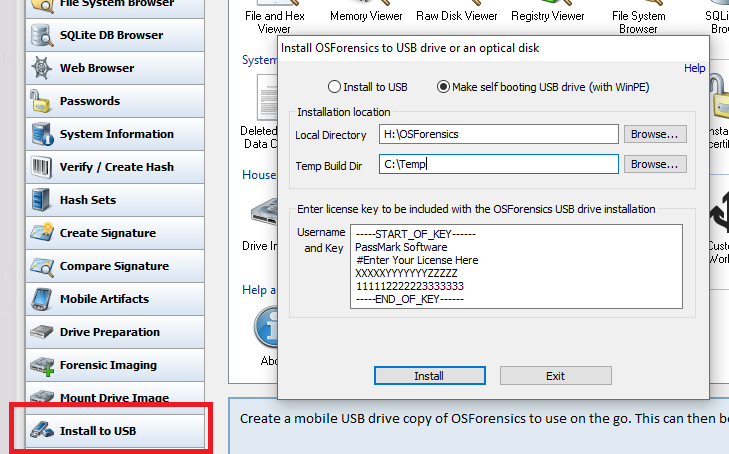
In OSForensics, choose "Install to USB". The Install to USB function will place all the necessary files to run a standalone version of OSForensics without having the software installed on the system beforehand. Select "Make self booting USB drive with WinPE)". Specify a location where you wish to place the files temporarily, this must not be a location on the USB drive and should be a temporary directory on the local hard drive. Remember the location, as it will be used later on in WinPE Builder. For "Installation Type", select licensed and enter in your license key. When ready, click install, upon completion, WinPE Builder will automatically launch. If it does not, you can manually start it from the OSForenscis program installation directory.(Note: 32-bit version of OSForensics will not run in a 64-bit WinPE environment – you will need to 64-bit version of OSForensics in this scenario.)
Specifying the WinPE build environment
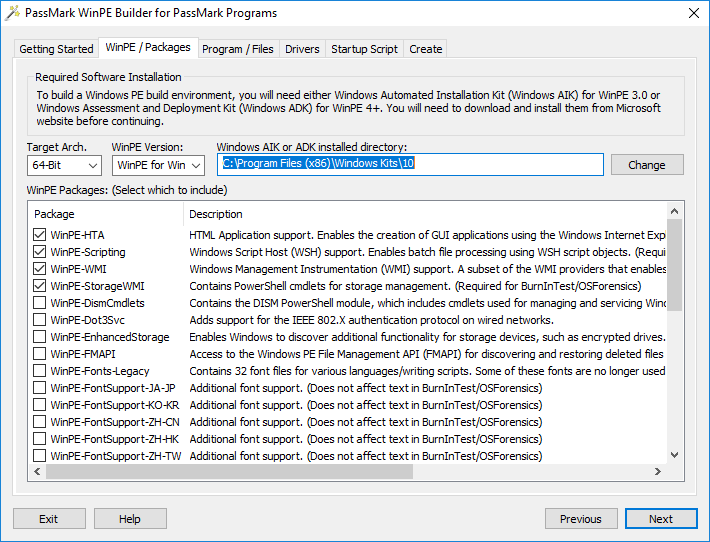
Our base Windows PE image will based on 64-bit WinPE for Win10 environment. (Note: 32-bit version of OSForensics will not run in a 64-bit WinPE environment – you will need to 64-bit version of OSForensics in this scenario.) WinPE for Win10 is selected because of its native support for USB 3.0 and newer hardware. We will leave the Additional Packages on their default selection. Only WinPE-HTA, WinPE-Scripting, WinPE-WMI, and WinPE-StorageWMI are required.
In the "Windows AIK or ADK installed directory:" location box. Enter in where you have installed the kit. The default location is pre-entered, if you have chosen to change the install directory. You will need to point to the location where you have it.
Adding OSForensics to the WinPE Image
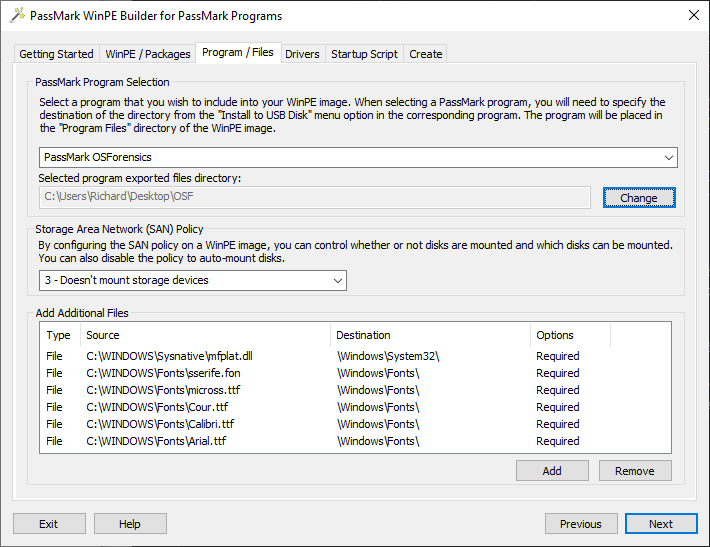
On the Program / Files tab, select PassMark OSForensics in the drop down box and navigate to the folder in the previous step where you saved the OSForensics files.
Setting the Storage Area Network (SAN) Policy can control whether or not disks are mounted when WinPE is started. The available SANS settings as allowable by WinPE are:
- 1 - Mounts all available storage devices.
- 2 - Mounts all storage devices except those on a shared bus.
- 3 - Doesn't mount storage devices.
- 4 - Makes internal disks offline. Note: All external disks and the boot disk are online. [Recommended for most use cases.]
Option (1) is easiest to use as all mountable drives are available upon booting into WinPE. However should only be used IF the user can accept minor changes to the file system(*). Option (3) is the most secure in that WinPE will not mount any storage devices. However, this prevents the user from creating a forensic image to a connected disk as external/storage devices are not mounted. A compromise and the recommend setting for OSForensics is option (4), "4 - Makes internal disks offline.", which can prevent introduction of artifacts on the internal storages, but allow external drives to be accessible to the invesigator. When using option 4, the best practice approach would be to disconnect any suspect's external storage devices from the suspect machine before booting. To process any of the external devices on-scene, the invesigator should launch OSF from their laptop, then use a hardware write-blocker or the USB write-blocker option within OSF, before connecting the external drive and preview contents and/or image with OSF. See limitations section for how to access the system's internal storage within OSForensics.
(*)During testing it was found that if the evidence drive is connected during system start up, it is possible the first superblock (typically offset 1024 within the partition) on the filesystem the drive may be altered. Values that were changed include the last mount time, last write time, mount count and a byte at location 0x0178 within the superblock. The exact changes made by the operating system will depend on the file system in use and the version of WinPE.
The "Add Additional Files" will automatically populate with four font files that are needed for OSForensics. If you would like to place any additional files into the image, you can do so with "Add" button.
Adding Drivers (Optional)
Install the NIC and Mass Storage (RAID) drivers that you need for your target system. In many cases this is not required. You will need to specify the folder the drivers (.inf) files are in. During the build process, the folders with be recursively searched for any valid .inf driver files.
Startup Script
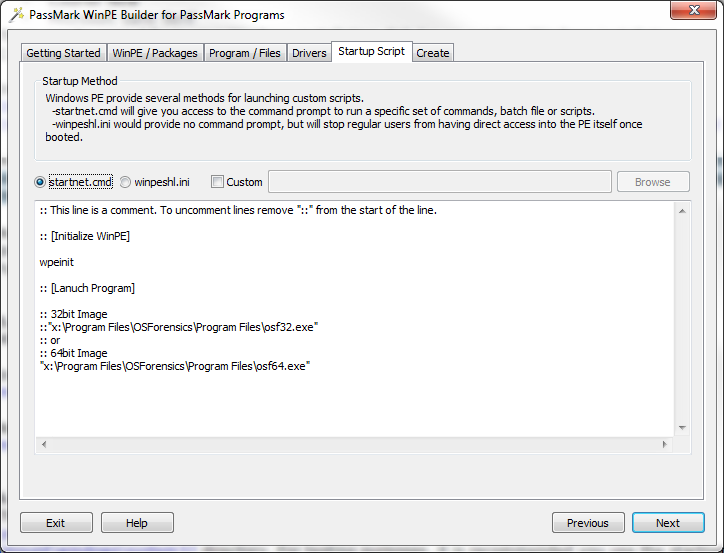
The startup script is used to tell Windows PE to launch OSForensics after booting. There are two default script provided. The first uses "startnet.cmd" method which will give you access to the command prompt to run additional commands, batch files or scripts. The alternative method is "winpeshl.ini" which will not provide access to the command prompt. We will select startnet.cmd and use the default script generated.
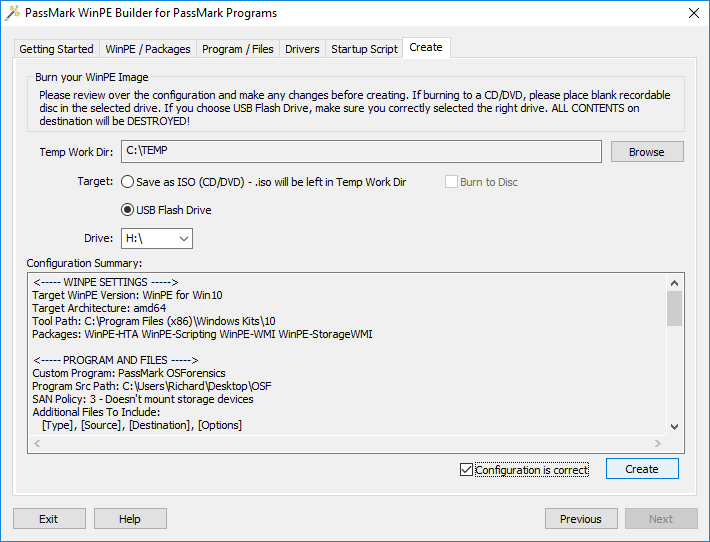
Create the Image
The default "Temp Work Dir" will be the directory you launched the WinPE Builder program from. If for some reason, this is not an appropriate location, you can specify another directory. The location should have around 500 MB of free space. (Note: DO NOT use the OSForensics directory in the previous step as the temp work directory.)
Select "USB Flash Drive" as the target and specify the drive letter for the USB flash drive. Look over the configuration summary to verify the settings are correct. When satisfied, check the "Configuration is correct" checkbox to enable the "Create" button.
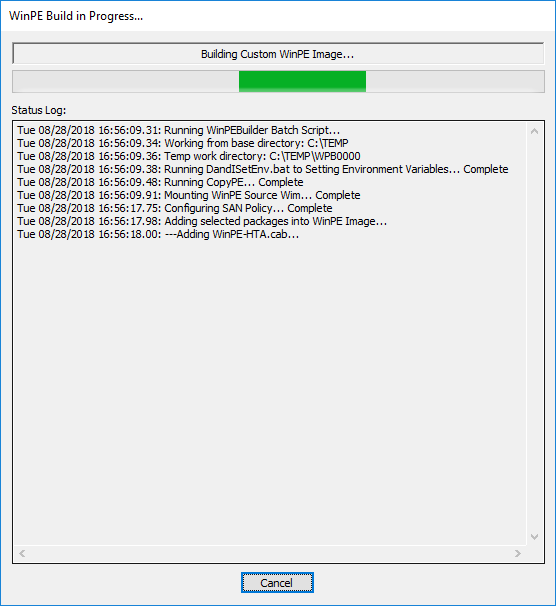
Sit back and wait...
A build progress screen should appear and the build process will be under way. Once complete, the USB Flash Drive can be used to boot a system into OSForensics.
Limitations
- Create Index: You will not be able to index some file formats from 64-bit WinPE. This is due to the fact that 64-bit WinPE does not support 32-bit executables, and indexing some file formats require the use of 32-bit components. Instead, we recommend imaging the disk, and performing the indexing from an investigation machine (which should be faster and have more resources than the machine being investigated). This is generally the most practical approach given that indexing is very resource intensive.
- Disk/Volume Access: When using SAN Policy (3) or (4), internal storage locations are not mounted when booting. To process the drives, first add them to the case using "Add Device".
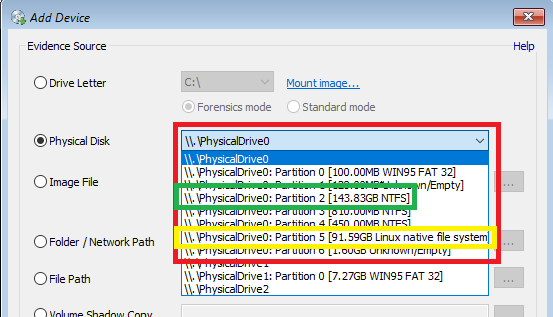
The Physical Drive listing/order may vary on different systems. Example is shown with different partitions highlighted, does not represent view in OSForensics.
- The Red Box shows the system's main storage, PhyiscalDrive0 with various partitions on the disk.
- The Green Box shows the user's installed Windows OS partition, PhyiscalDrive0: Partition 2.
- The Yellow Box shows the user's installed Linux OS partition, PhyiscalDrive0: Partition 5.
- The WinPE boot USB Flash Drive (UFD) is PhyiscalDrive1. When booting from a WinPE disk, the WinPE image is loaded into RAM Disk and and the volume letter assigned to RAM Disk is X:\.
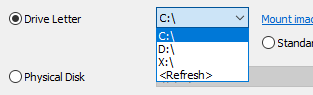
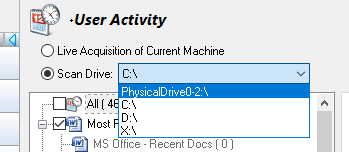
When using option (4), the RAM Disk is still X:\, but the physical UFD and other external storage devices will be assigned drive letters as well. In the picture below, C:\
is the UFD, D:\ is SD Card Reader, X:\ is the WinPE RAM Disk.
Internal storage devices added to OSForensic using PhysicalDrive access method can be used within the different modules and will be listed in the dropdowns as selectable devices. e.g. User Activity
Troubleshooting...
- WinPEBuilder Error 10: See the following forum post
- Failed to open output batch file: Check that Temp Working Directory exists, if not it will need to be created.


