Importing NSRL hash sets from NIST
You can import the National Software Reference Library (NSRL) data set as a hash set in to OSForensics.
The NSRL is a project by the U.S. Department of Justice's National Institute of Justice (NIJ), federal, state, and local law enforcement, and the National Institute of Standards and Technology (NIST). They collect software profiles into a Reference Data Set (RDS) which allow you to review and identify files by their digital signatures.
Previously, these data sets were available for download in CSV format, however the most current primary March 2023 sets are distributed via sqlite3 database file.
Download and Conversion
For versions of the NSRL dataset after RDSv3. The dataset must be converted to CSV format to be imported into OSForensics. Follow the instructions below to convert the data to the appropriate format.
Note that a Unix based operating system or an emulated bash shell is required to perform the conversion.
- Download the dataset from http://www.nsrl.nist.gov/ (check the "Downloads" section). .
- Extract the .ZIP file contents to a temporary directory.
- Either follow the instructions provided by NSRL or run this script in the downloaded directory.
- The converted file may contain incorrectly exported unicode characters depending on the version of sqlite used to export the data. If the data cannot be imported, a unicode conversion can be performed by running this script.
Additionally, the pre-converted datasets can be offered as a download via request sent to info@passmark.com. The datasets also come pre-converted as part of the OSForensics rainbow tables Rainbow Table & Hash Set Collection.
Importing into OSForensics
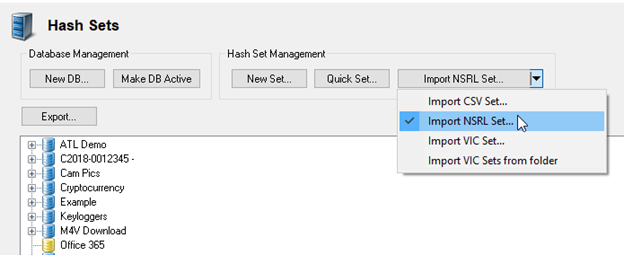
- Open OSForensics and click on the Hash Sets module.
- Under Hash Set Management, click the down arrow and select ‘Import NSRL Set…’
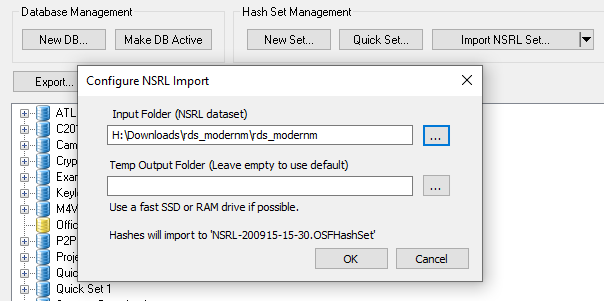
- Once selected, click the button to start the import process.
- Point OSForensics to the folder containing the extracted contents of the .ZIP file.
- You can select a temp output folder or leave blank to use the default setting, then click OK.
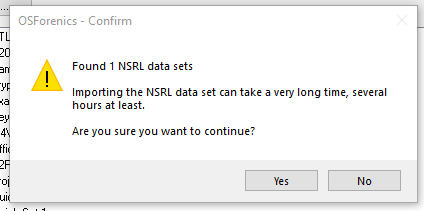
- You will receive a confirmation message and a prompt warning you that the process will take a long time to complete. When ready to begin, simply click ‘Yes’.


Import duration
Note that due to the large amount of data in these hash sets, this process can take a very long time to
complete. In fact, on some slower systems, this can take up to several days. One way to make the process more
manageable is to only import one disk at a time. This would mean in step 3 above you would only extract one of
the zips, then remove it and extract the next and repeat the process importing into the same database. This is
one scenario where importing to a non-empty database is recommended. This will actually take more time total
but breaks the task up into shorter steps. You can also back-up the database in between each import in case an
error occurs this way.
Another way to speed up the process is to make sure the database is on a solid state hard drive or a RAM
drive. Import time is highly dependent on the random seek read/write performance of the drive. On an average
system with a normal hard drive the process takes about 50 hours. On a RAM drive the process has been seen to
take as little as 10-15. A solid state drive will likely have a import time somewhere between these two
figures.


